
If you’ve had a bridge fitted or an implant placed, your dentist almost certainly told you to keep it clean - and then handed you the same advice everyone gets: floss every day.
Here’s the problem nobody mentions: standard string floss physically can’t do the job on a restoration. It doesn’t fit under a bridge, and around an implant it’s clumsy at best and harmful at worst. So the most expensive dental work in your mouth ends up being the hardest to clean, and the consequences of getting it wrong aren’t a cavity. They’re the failure of the whole restoration.
There’s a better tool for this, and the evidence backing it is unusually solid.
Why floss falls short on restorations
A natural tooth sits in its socket held by a ring of fibers that seal the gum tightly to the tooth. Floss slides down between two teeth and cleans that contact point. Simple.
Restorations break that model in two different ways.
A bridge has no gap to thread through. The false tooth in the middle, the pontic, spans the space where a tooth used to be and rests directly against your gum. There’s no opening from the top to slide floss through. To clean underneath, you have to thread floss from the side using a floss threader or stiff-tipped floss, feed it through, and saw it back and forth. Most people find it fiddly, do it badly, or quietly give up.
An implant lacks the natural seal. An implant fuses to bone, but the soft tissue around it doesn’t attach the way it does to a real tooth - the protective fiber cuff isn’t there. That makes the tissue around an implant more vulnerable to bacteria, and it makes aggressive flossing risky: shredded floss fibers can catch and lodge in the space, and hard scraping can disturb the delicate tissue seal you’re trying to protect.
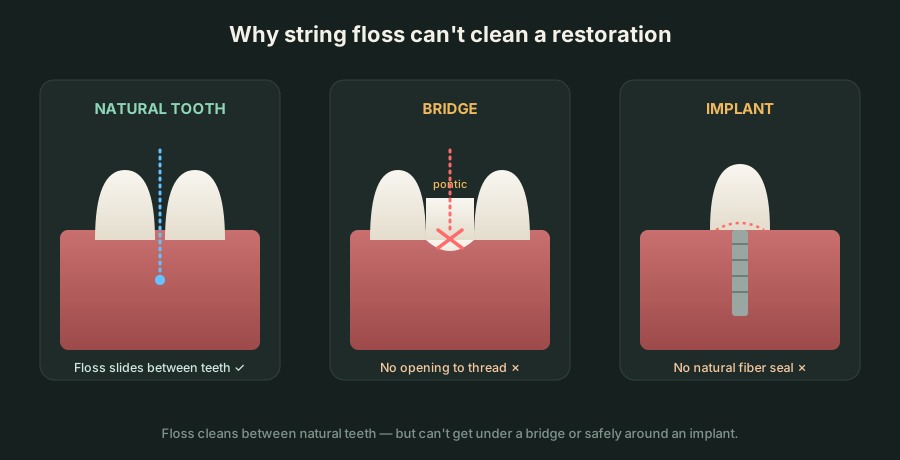
The result is that plaque and food collect in exactly the spots you can’t reach - the underside of the bridge, the collar around the implant - and that’s precisely where the trouble starts.
What’s at stake when you can’t clean it
This is the part worth taking seriously, because the failure modes for restorations are worse than an ordinary cavity.
Around implants: peri-implantitis. When plaque builds up around an implant, the gum inflames (peri-implant mucositis) and, if it progresses, the inflammation destroys the bone anchoring the implant - peri-implantitis. This is common and consequential: systematic reviews put peri-implant mucositis at roughly 43% of implant patients and peri-implantitis at around 22%. Lost bone around an implant doesn’t grow back, and advanced cases can cost you the implant entirely.
Around bridges: decay and gum disease at the anchors. A bridge is cemented onto your own natural teeth on either side (the abutments). Plaque trapped under the pontic inflames the gum and attacks those supporting teeth - and if an anchor tooth decays under the crown, the whole bridge can fail. Trapped food under a bridge is also the source of that persistent bad odor a lot of bridge-wearers notice.
In both cases the mechanism is the same: debris you can’t remove leads to inflammation, and inflammation around a restoration destroys the thing holding it in place.
Why a water flosser is the right tool
A water flosser (a dental water jet, or oral irrigator) cleans with a pulsating stream of water instead of a physical string. Rather than threading anything, you aim the tip at the gumline and the restoration, and the water flushes out debris and disrupts plaque bacteria - including in the spots floss can’t reach.
For restorations specifically, that mechanism is a much better fit - and the research bears it out.
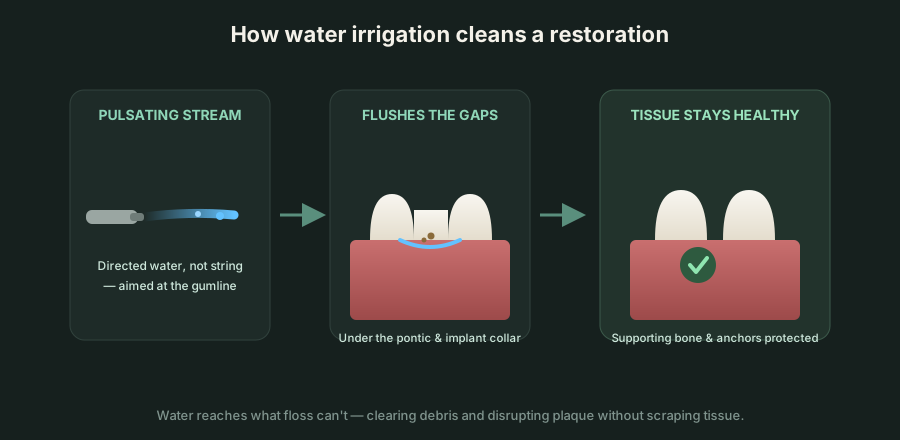
- It gets under bridges. The stream flows beneath the pontic and clears trapped food and plaque with no threader required.
- It’s gentle on implants. Water cleans the abutment and gum collar without scraping tissue or shredding fibers into the space. In a randomized trial, implant patients using a water flosser saw significantly greater reduction in bleeding than those using string floss - 81% versus 33% of bleeding sites improved.
- It reaches where floss won’t. Irrigation cleans deeper and around the awkward angles of a restoration that floss simply can’t follow.
- You’ll actually keep doing it. It’s faster and less fiddly than threading floss, and consistency is the entire game with restorations.
How to use one around your restoration
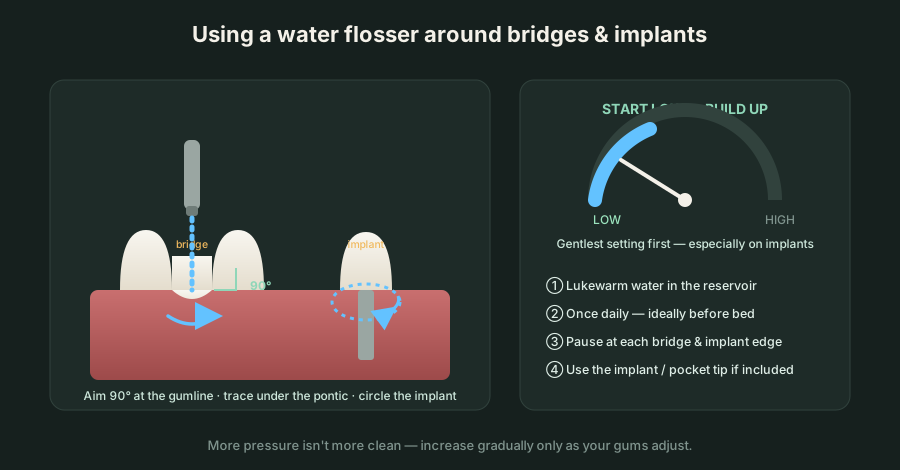
The technique matters, especially early on and especially around implants. This mirrors the guidance on the product page - use once daily, start at the lowest pressure, aim 90° at the gumline - with a bit more detail for restorations:
- Fill the reservoir with lukewarm water. Add a little antimicrobial mouthwash only if your dentist recommends it.
- Start on the lowest pressure setting. This matters most around implants and any recently placed work. Increase gradually over days as your gums adjust - more pressure is not more clean.
- Lean over the sink and place the tip at the gumline, angled about 90°.
- Trace slowly along each restoration, pausing at the edges of the bridge and around the full circumference of each implant to flush the area.
- Aim under the bridge pontic from both the cheek side and tongue side to clear anything trapped beneath it.
- Run it once daily: most people do it right before bed, so debris isn’t sitting there overnight.
If your flosser comes with a specialized tip - often called an implant, plaque-seeker, or pocket tip - use it around restorations for better access to the collar and margins.
A note on pressure
The instinct to crank the pressure up is the same mistake people make brushing too hard. Around implants and fresh restorations, high pressure can irritate healing tissue with no added benefit. Start gentle, work up to a setting that flushes effectively without discomfort, and if you’ve had recent work done, check with your dentist before turning it up.
Where the cordless Waterpik fits in
For bridges and implants, a cordless water flosser is usually the right pick. It’s compact, runs off a rechargeable battery with no cord tethering you to an outlet, and travels easily - which matters, because the tool that protects your restoration is the one you’ll actually use every day, at home or away.
The Waterpik Water Flosser (Cordless) is built for exactly this job. As the product page puts it, you just point and rinse - it gets into the spots regular floss can’t reach. Waterpik is the brand behind most of the clinical research on water flossing, including the implant study above, so the “does it actually work” question is about as settled as these things get. Use it once daily, start at the lowest pressure, and aim it 90° at the gumline - the same routine that keeps a restoration clean is the one that keeps it lasting.
The point isn’t the gadget. It’s the principle: the work in your mouth is only as good as your ability to keep it clean, and for a bridge or an implant, a water flosser is the tool that actually can.
The takeaway
Bridges and implants change the rules, and the old “just floss” advice doesn’t cover them. String floss can’t get under a bridge and isn’t safe to force around an implant - and the debris left behind is what drives peri-implantitis and bridge failure, problems far more expensive than the cavity you were worried about. A water flosser reaches what floss can’t, cleans gently enough for the tissue around an implant, and takes about a minute a day. For anyone with a restoration, it’s not a nice-to-have. It’s the tool the job actually requires.
Sources
- Ferreira SD, et al. Prevalence and risk variables for peri-implant disease, systematic review / meta-analysis: peri-implant mucositis (~43%) and peri-implantitis (~22%) prevalence.
- Magnuson B, et al. Comparison of the effect of two interdental cleaning devices around implants, International Journal of Dental Hygiene / Waterpik clinical data, 2013 , water flosser vs. string floss on implant bleeding sites (81% vs. 33% improvement).
- American Academy of Periodontology: peri-implant mucositis and peri-implantitis: definitions, progression, and bone loss.
- American Dental Association, Oral Health Topics - Implants and Home oral care - cleaning around fixed restorations.
- Gil-Montoya JA, et al. - oral irrigation and plaque/bleeding reduction around fixed prostheses.
- Waterpik: product information and usage guidance (brand claims).
This article is for general educational purposes and isn’t a substitute for personalized advice from your dentist.